🏡🌡️🖥️Monitor your central heating with ESPHome

Recently I found some nice Dallas temperature sensors on AliExpress. These sensors came with a metal probe enclosure and one meter wires attached to it. I ordered some without a special reason just have them around. Couple days later I watched a YouTube video from Sir GoodEnough where he added such sensors to his cottage heating system. That inspires me to add these sensors to my central heating as well 🙃.
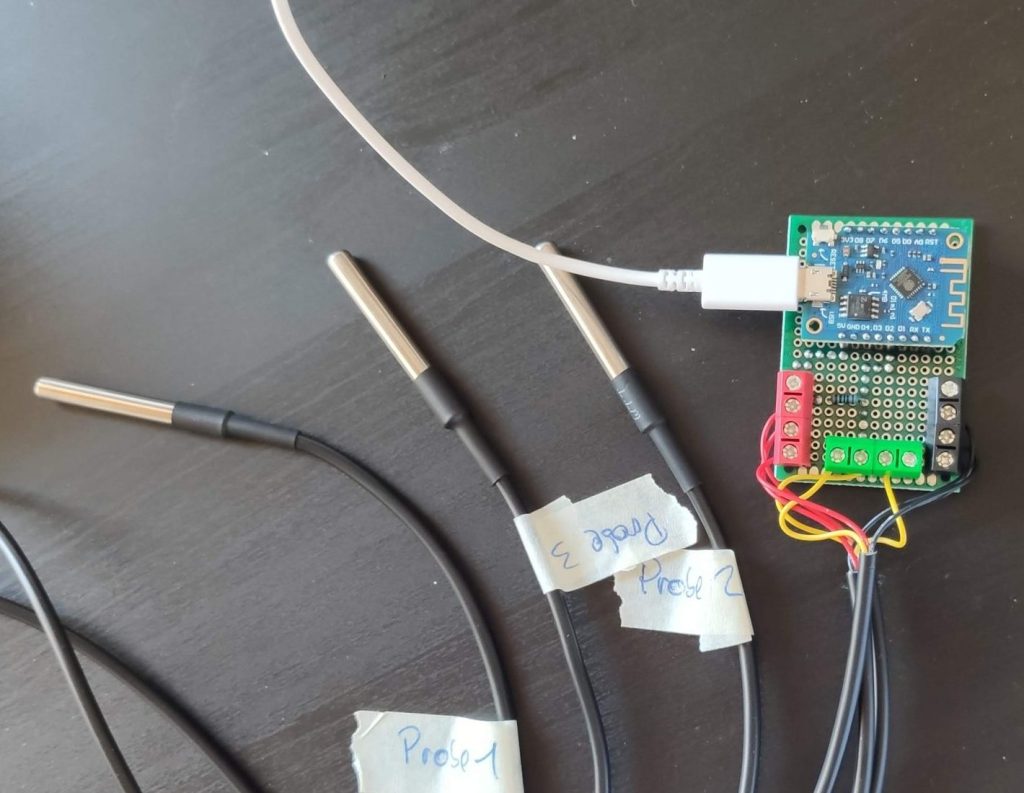
Bench test of the sensors

The Idea

To monitor the temperature of my central heating unit I wanted to place four sensors to the system. One at the hot water tank and three to the heating system itself. All sensors must be attached outside the water system. That way the system stays untouched and I don’t have to be afraid about leaks, etc. All sensors are linked together on a perfboard which also houses a D1 Mini that runs ESPHome to get all the data into Home Assistant. This is a similar design as in my DIY Yardbell project.

Parts list

For the DIY heating monitor we will use the following components:

*Some links are affiliate links. If you use them to buy the parts for your project you will help me and my next project. These links will cause no extra fees or costs to you

All components expect the enclosure and one probe

Let’s Go!

Let’s start by placing the screw terminals onto perfboard. I chose to use red for VCC, black for GND and green for data. That way I don’t get confused during connecting the sensors to the board later on. After placing the terminals, solder them to the board. Thx to the sensors, all data ports can be soldered to one dataline (Pin) on the D1 Mini so all data terminals can be bridged.

Downside of the perfboard with the screw terminal soldered on to
Downside of the soldered perfboard

After that, figure out where the D1 Mini has to go. I placed it with the USB port up. That way the pins for VCC, GND and some data pins are facing the screw terminals. Further I soldered one male and female pin header to the board. With this setup it’s impossible to put the D1 Mini in the wrong orientation later on.
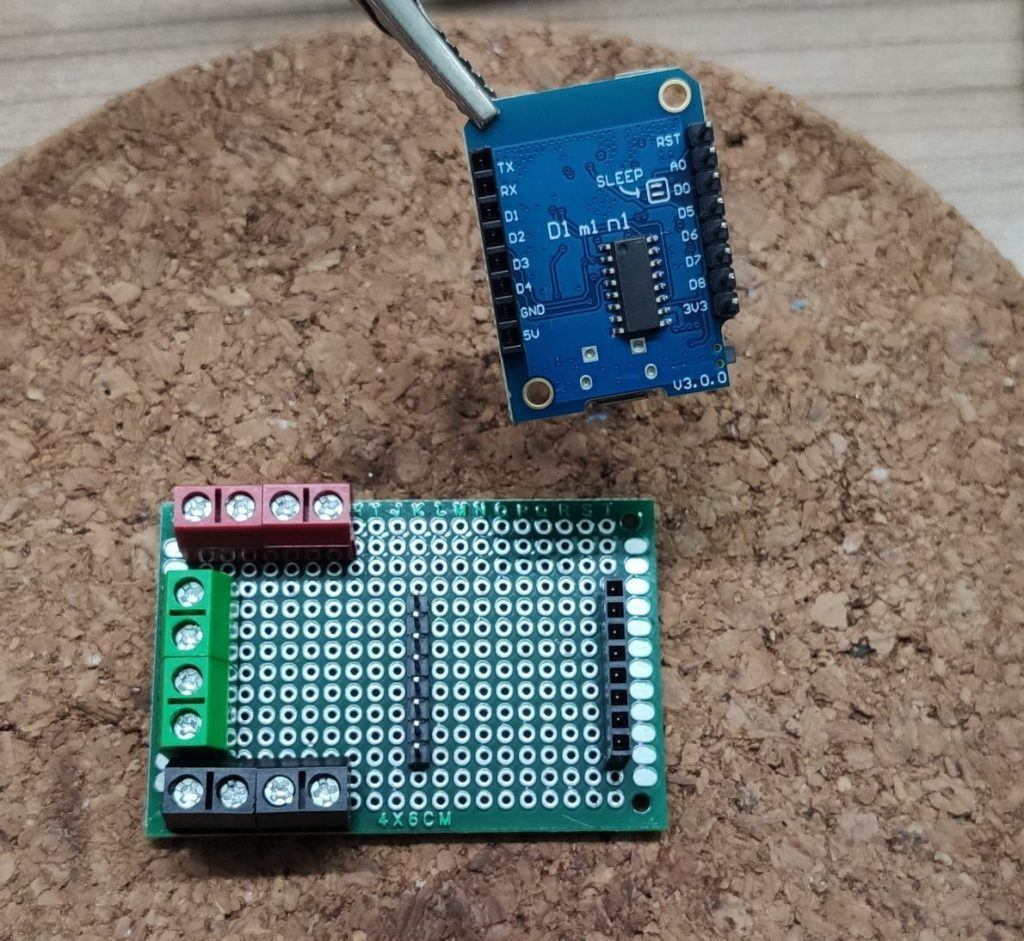
Top view of the perfboard and the D1 Mini with soldered connections.
Soldered D1 Mini pins

Choose a pin

Because all sensors will use the same data pin, connecting the sensors to the D1 Mini is quite easy. In my case I selected pin D2 (GPIO4) as the data pin. To prevent the pin from floating, its recommended to use a pull up resistor between data and VCC. ESPHome recommends a 4.7kΩ resistor but the board will use 4 sensors in parallel, so I decided to go with a 1KΩ resistor to create a strong pull up. Choose the value that fits for your setup.
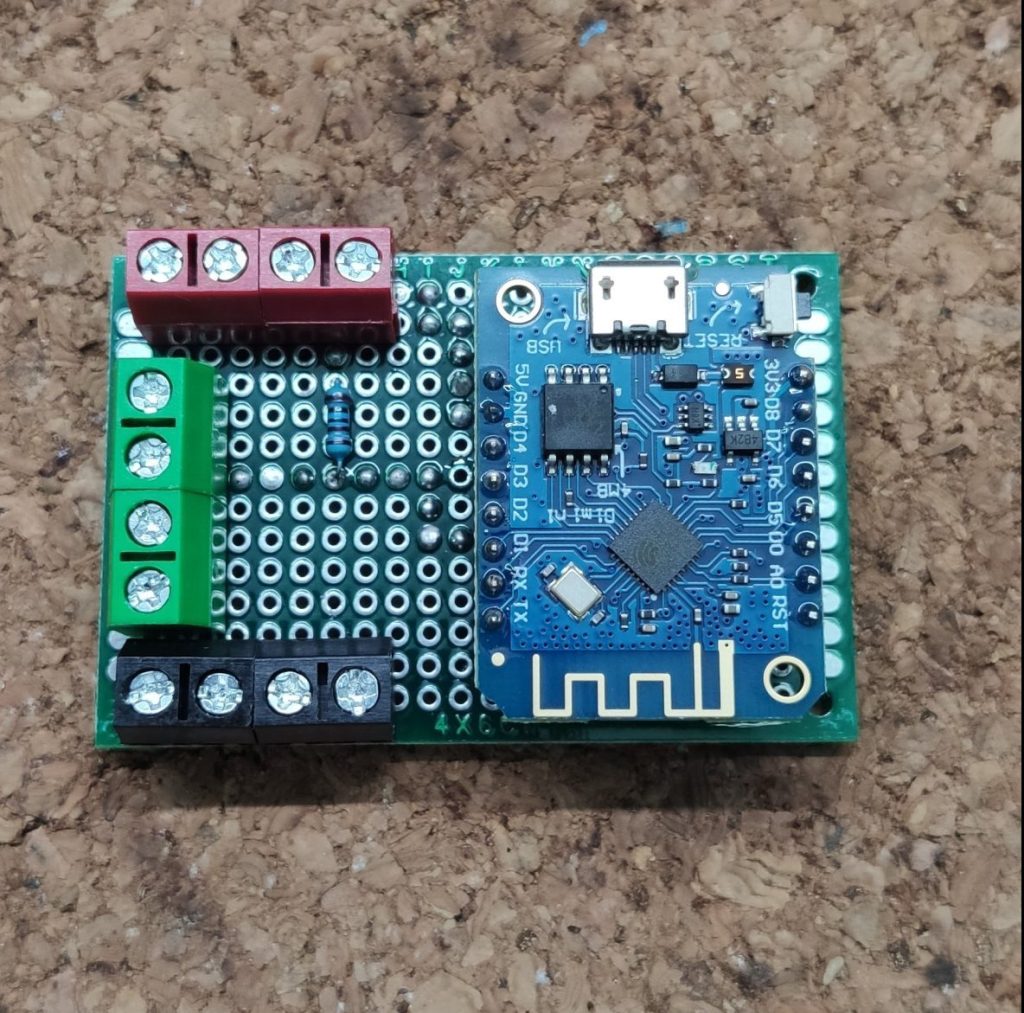
Top view of the board with the soldered data pin connected and the pull up resistor in place
Data line and pull up resistor connected soldered from the backside

Finalizing the board

To provide the sensors with power, they must be connected to the D1 Mini. This is done as same as the data line, from the backside of the board. Its possible to simply bridge the pads or if you have a small spare wire, like me, just use that to connect the screw terminals. I used both methods to connect the GND and VCC terminals to the D1 Mini. The D1 Mini it self uses the power from the micro USB port.
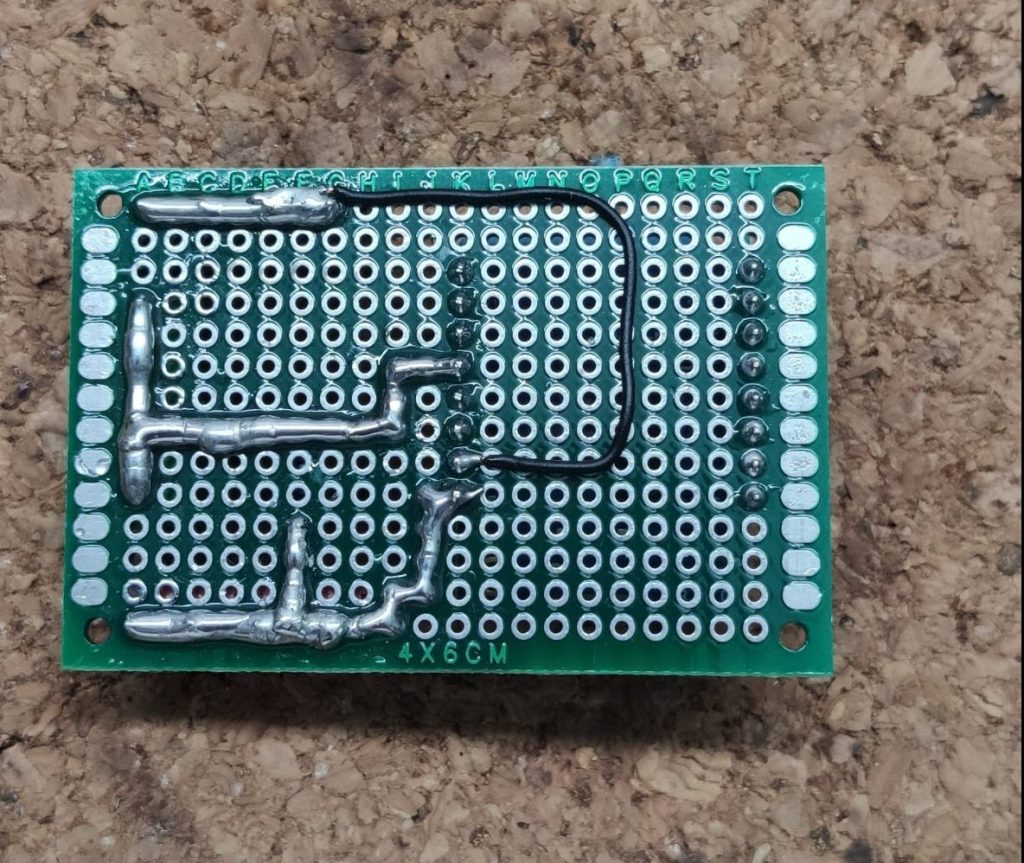
Top view of the backside of the board
Backside with connected VCC and GND

Into ESPHome

After all the soldering, its time to connect the D1 Mini and write / flash the ESPHome sketch. You can do that using the ESPHome web flasher. The easiest way to configure the sensors is to follow the recommendation in the ESPHome documentation. First prepare the basic sketch and connect one sensor. Then check the logs for the sensor address to specify it in the sketch and reflash the sketch after configuring the sensor. Repeat this process with all sensors.

Basic ESPHome sketch

esphome:
  name: heaterroom-thermostat

esp8266:
  board: d1_mini

# Enable logging
logger:

# Enable Home Assistant API
api:
  encryption:
    key: "auto-generated-key"

ota:
  password: "auto-generated-password"

wifi:
  ssid: !secret wifi_ssid
  password: !secret wifi_password

  # Enable fallback hotspot (captive portal) in case wifi connection fails
  ap:
    ssid: "Heaterroom-Thermostat"
    password: "$up3rP4sSw0rd"

captive_portal:

#temperature sensors
dallas:
  - pin: D2
Screenshot of logs after connection the 3 sensor
Logs after connection the 3 sensor

The final sketch should look similar to this one.

Final ESPHome sketch

esphome:
  name: heaterroom-thermostat

esp8266:
  board: d1_mini

# Enable logging
logger:

# Enable Home Assistant API
api:
  encryption:
    key: "auto-generated-key"

ota:
  password: "auto-generated-password"

wifi:
  ssid: !secret wifi_ssid
  password: !secret wifi_password

  # Enable fallback hotspot (captive portal) in case wifi connection fails
  ap:
    ssid: "Heaterroom-Thermostat"
    password: "$up3rP4sSw0rd"

captive_portal:

#temperature sensors
dallas:
  - pin: D2

# Individual sensors
sensor:
  - platform: dallas
    address: 0x61b0d35b1f64ff28
    name: "Probe 1"
  - platform: dallas
    address: 0x753d852d1864ff28
    name: "Probe 2"
  - platform: dallas
    address: 0x0f9e4b221864ff28
    name: "Probe 3"
  - platform: dallas
    address: 0x6623872d1864ff28
    name: "Probe 4"

If all sensors are configured properly the ESPHome device can be added to Home Assistant. It shows up as a regular device and promotes all the configured sensors which then can be renamed and added to a Home Assistant dashboard.
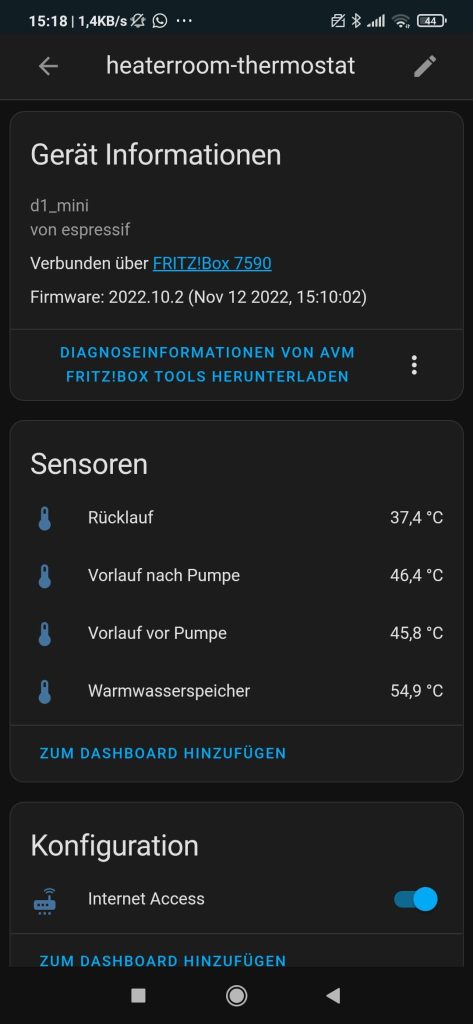
Screenshot of the home assistant entity view
Device shown in Home Assistant

Mount all the things

With all the configuration done, its time to mount the sensors to the heating system. I mounted the sensors at 4 points. The first one is the hot water tank. The sensor connects to the exposed metal on the top of the tank which is covered by isolation material.
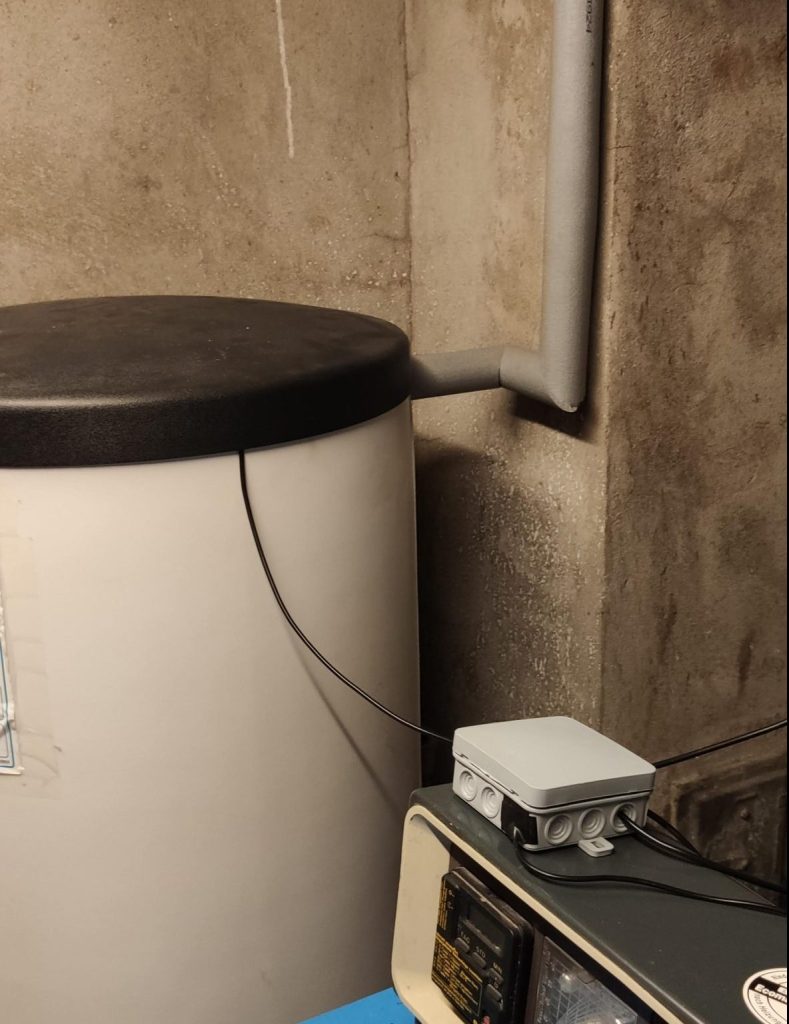
View of the hot water tank with the sensor connected
Tank sensor

The second and third sensor connect to the fore-run of the heating system. One before and one after the pump. That way I can see if something is wrong with the pump, if these temperatures differ much.

Side view of sensor connected to the fore-run
Sensor connected to the fore-run

The last sensor connects to the return-run of the heating system. That measurement must always be lower than the fore-run, otherwise something is badly wrong 😂. All sensors are fixed with zip tiles and covered by some isolation material to get the most accurate readings.


Last not least, I placed the board into a electrical junction box to protect it from dust and powered it with a phone charger. Pick an enclosure that fits for nearly every enclosure should work.
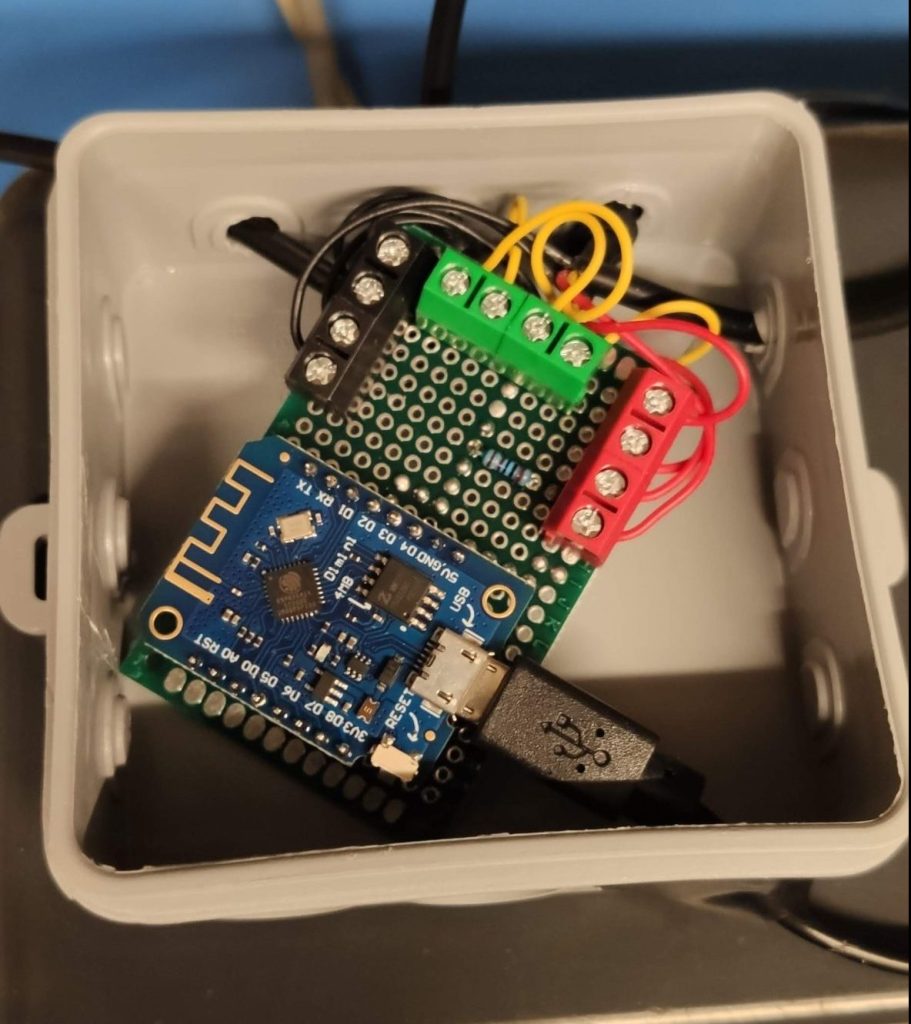
Top vie of the open junction box
Board in junction box

Sum Up

And that’s it! Your central heating system can now be observed in Home Assistant. The readings might differ a 0.5 – 1.0 degree from the in-pipe-thermostats, but this should not be a big deal if you’re monitoring such an old system😉.

If you like this project feel free to share it and if you have further questions, hit me up on twitter or in the comments below😎.
🏡🔔DIY yard bell with ESPHome and Home Assistant

During the last summer I often missed the bell from our front door when I was working in the back yard. This mostly ended up either in a missed package or pizza delivery which was kinda annoying. The solution for this problem was quite simple, a yard door bell and because I love tinkering I wanted to build my own version instead of buying an off the shelf product.

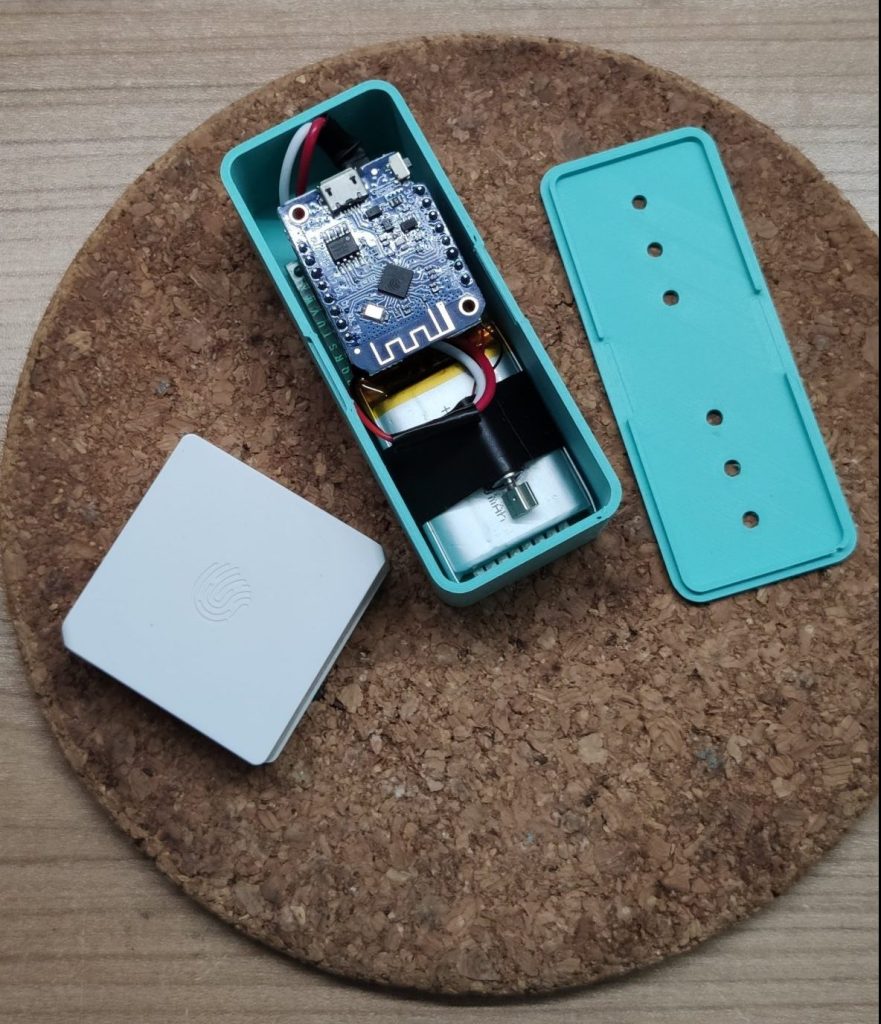
DIY yard bell circuit in a 3D printed case next to a zigbee button.
DIY yard bell in case with zigbee button

Parts list

For this yard bell we will use the following components:

*Some links are affiliate links. If you use them to buy the parts for your project you will help me and my next project. These links will cause no extra fees or costs to you

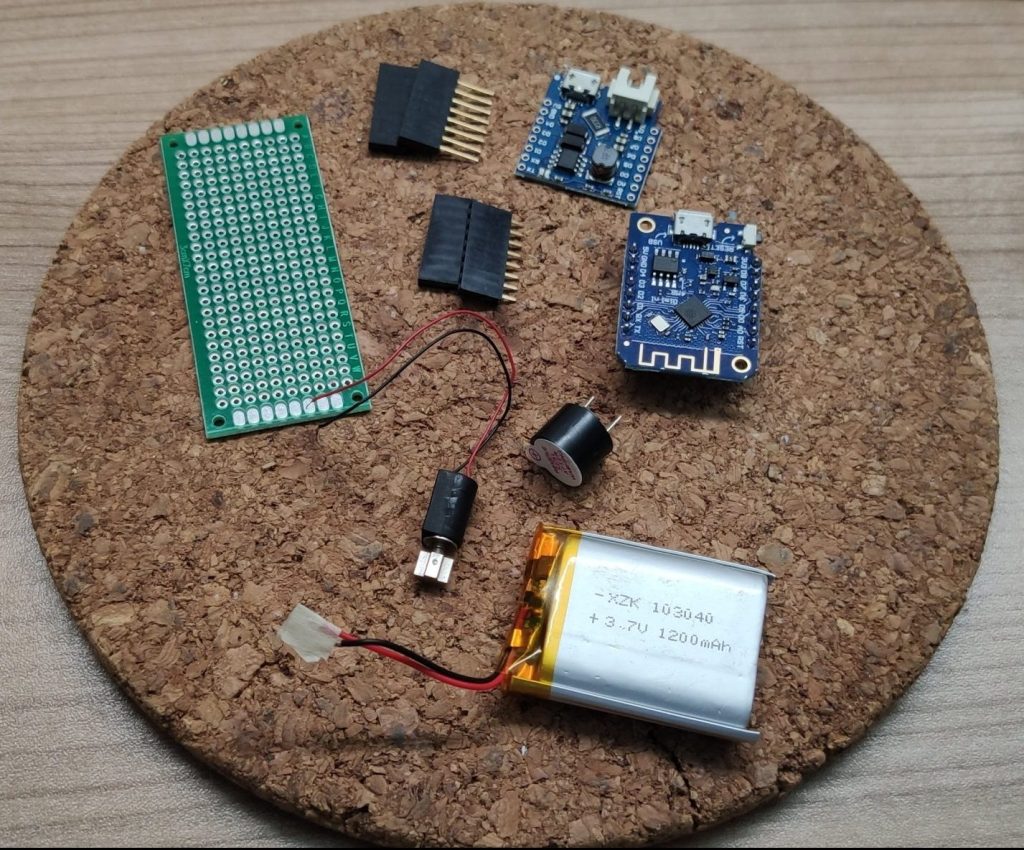
Top view of all components except the 3D printed case and the Zigbee button
All components except the 3D printed case and the Zigbee button

Starting on a breadboard

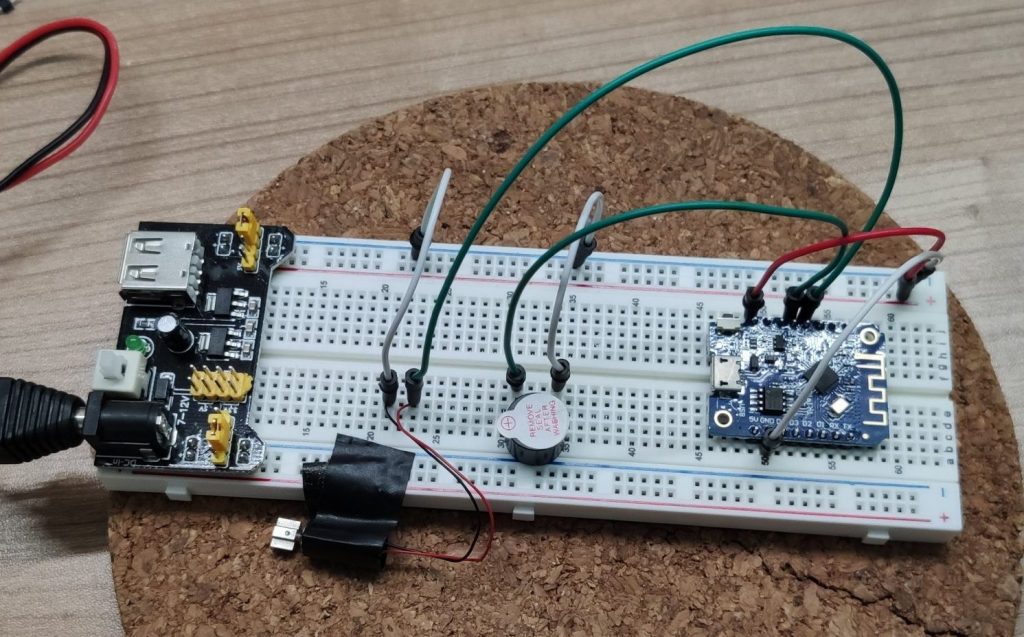
Because I had no clue if my idea would work, I started on a bread board. The D1 Mini is hooked up to 3.3V and the buzzer and the vibration motor are connected to two GPIO pins on the D1 Mini (D5 & D6). The idea is to pull both pins high when the Zigbee button is pressed which then turns on the buzzer and the vibration motor. After some delay both pins should turn low automatically. The D1 Mini is running ESPHome which makes it easy to announce both pins as momentary switches in Home Assistant.

Top view of the main circuit on a solder-less bread borad.
Main circuit on a bread board

The ESPHome sketch and Home Assistant

To make the pins available as momentary switches in Home Assistant I used the following sketch. This sketch connects to my Wifi and defines both pins as switches which auto turn off after 750-1000ms.

esphome:
  name: diy-yardbell

esp8266:
  board: d1_mini

# Enable logging
logger:

# Enable Home Assistant API
api:

ota:
  password: "SuperSecr3t"

wifi:
  ssid: !secret wifi_ssid
  password: !secret wifi_password

  # Enable fallback hotspot (captive portal) in case wifi connection fails
  ap:
    ssid: "Diy-Yardbell Fallback Hotspot"
    password: "SuperSecr3t"

captive_portal:

switch:
  - platform: gpio
    pin: D6
    id: buzzer
    name: "Buzzer"
    icon: "mdi:volume-high"
    on_turn_on:
    - delay: 750ms
    - switch.turn_off: buzzer
    
  - platform: gpio
    pin: D5
    id: vibrator
    name: "Vibrator"
    icon: "mdi:vibrate"
    on_turn_on:
    - delay: 1000ms
    - switch.turn_off: vibrator

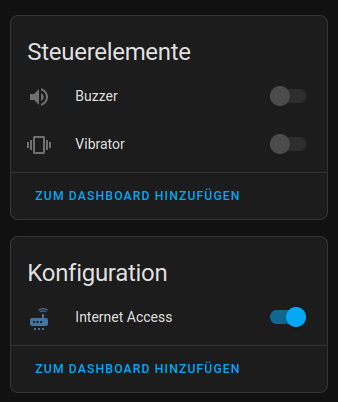
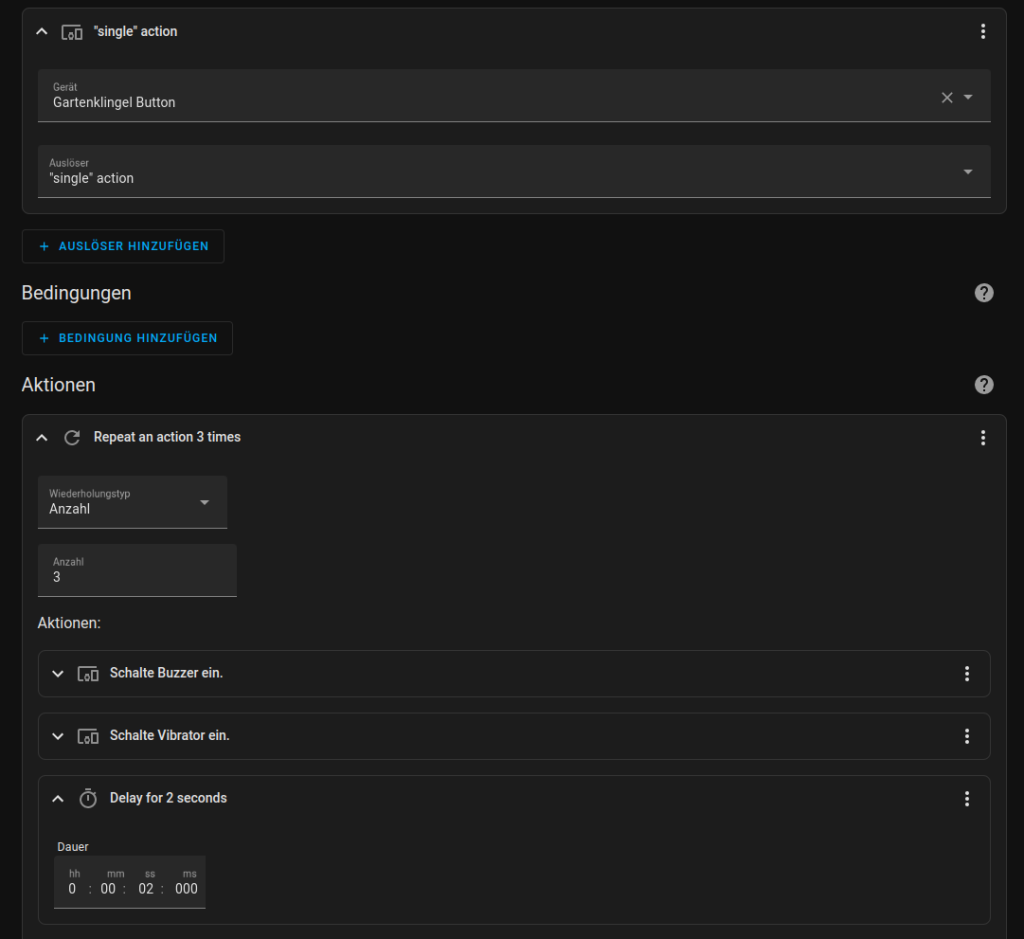
After uploading this sketch to my D1 Mini, the two pins show up as buttons in Home Assistant and I was able to create an automation which triggers both switch 3 times in a row with a delay of two seconds.

Screenshot of the details of the ESPHome device with German titles
Details of the ESPHome device with German titles
Screenshot of the Home Asssistant automation
Automation details triggered by the Zigbee button

With that all set I was able to give the project a first test.

Click here to display content from Twitter.
Learn more in Twitter’s privacy policy.

Lets start soldering

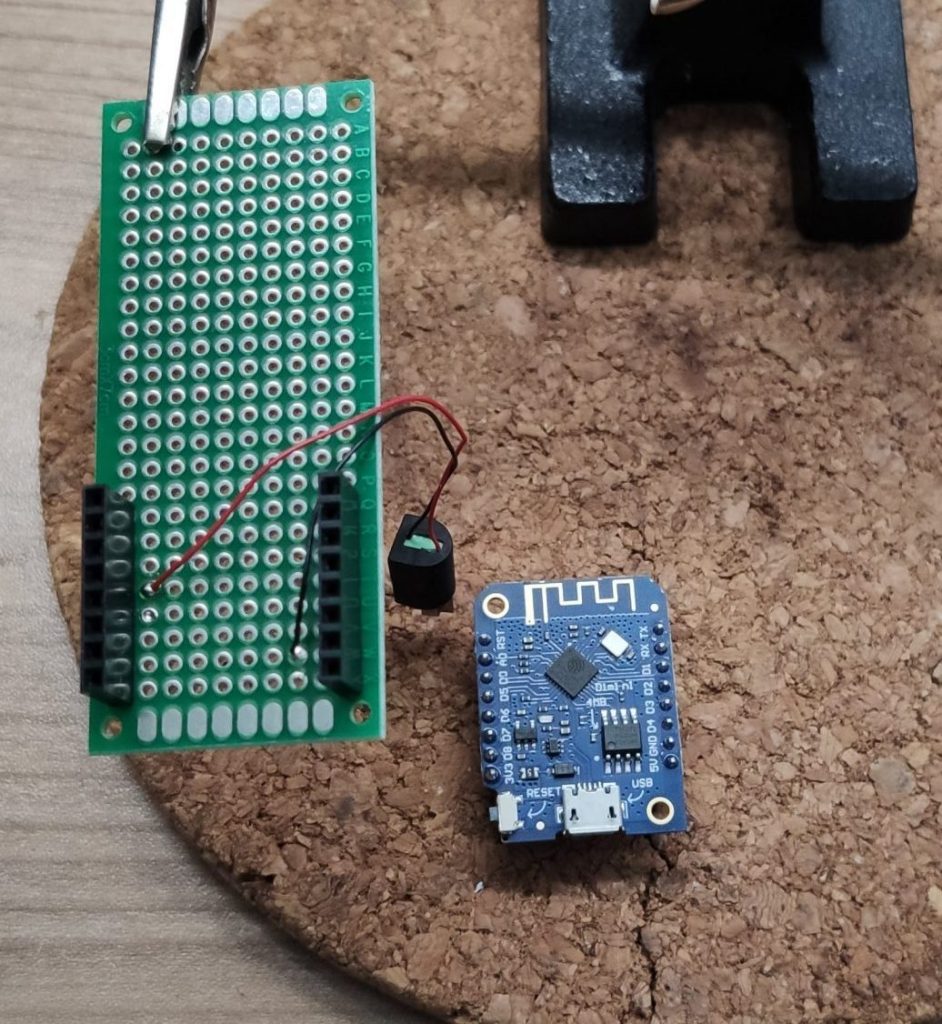
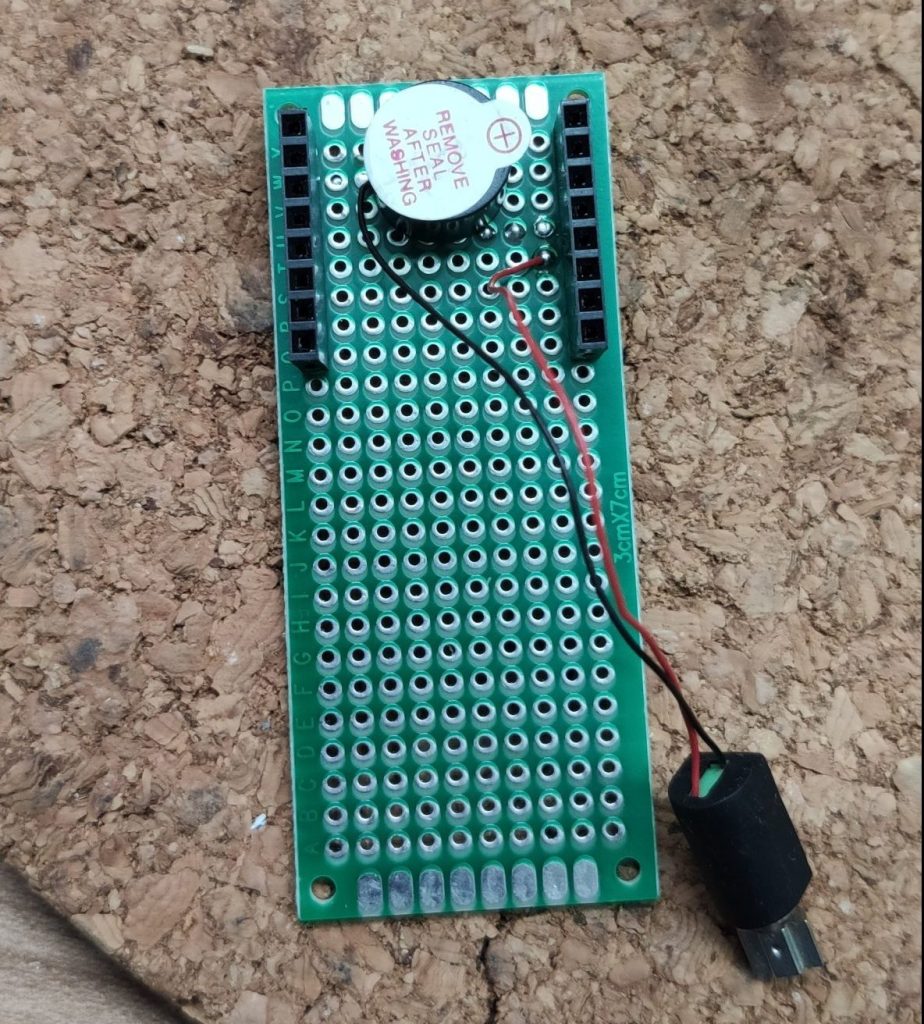
After the successful tests everything was ready to solder. I started with the short female connectors and soldered them onto the perfboard. Then I soldered the positive wire of the vibration motor to the D5 pin and the negative wire to the GND pin.

Top view of female connectors and vibration motor soldered to the perfboard
Female connectors and vibration motor soldered to the perfboard

In the next step I soldered the buzzer onto the perfboard. I chose a position where the negative leg of the buzzer lines up with the negative wire of the vibration motor, for easier connection.

Top view of the aligned buzzer
Buzzer aligned on perfboard

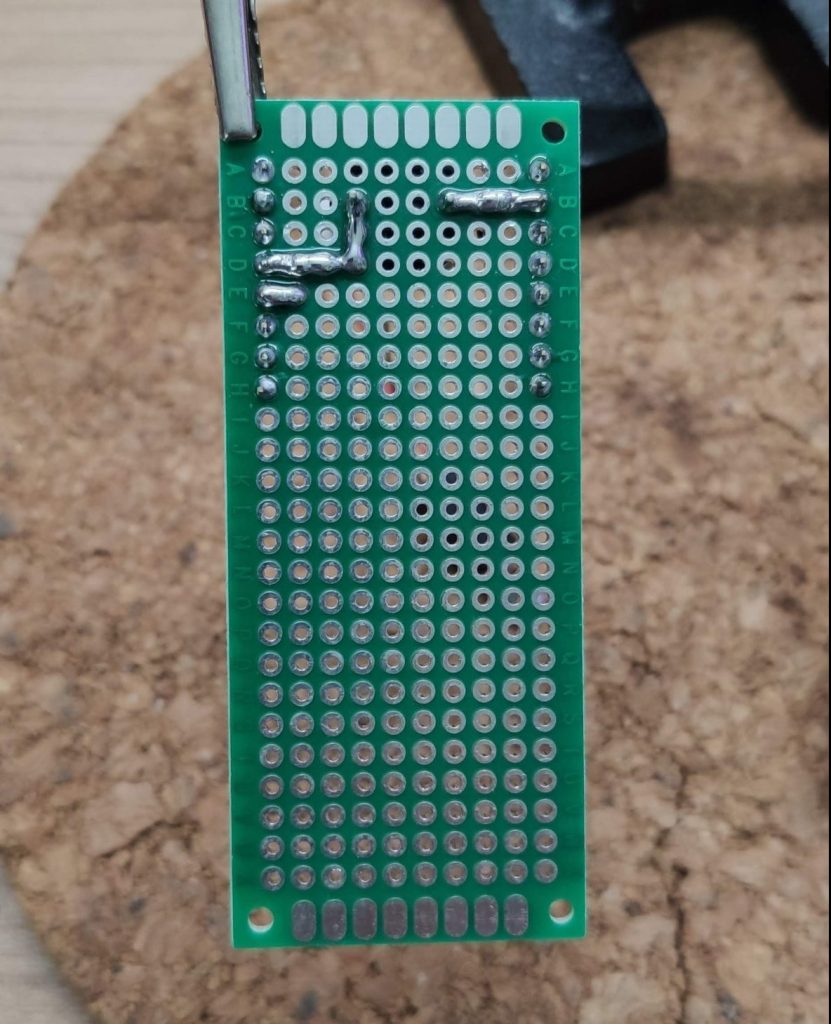
To persist the buzzer I soldered it in place and connected the positive leg to the D6 pin.

Bottom view of the soldered perfboard with buzzer connected to pin D6
The complete soldered perfboard

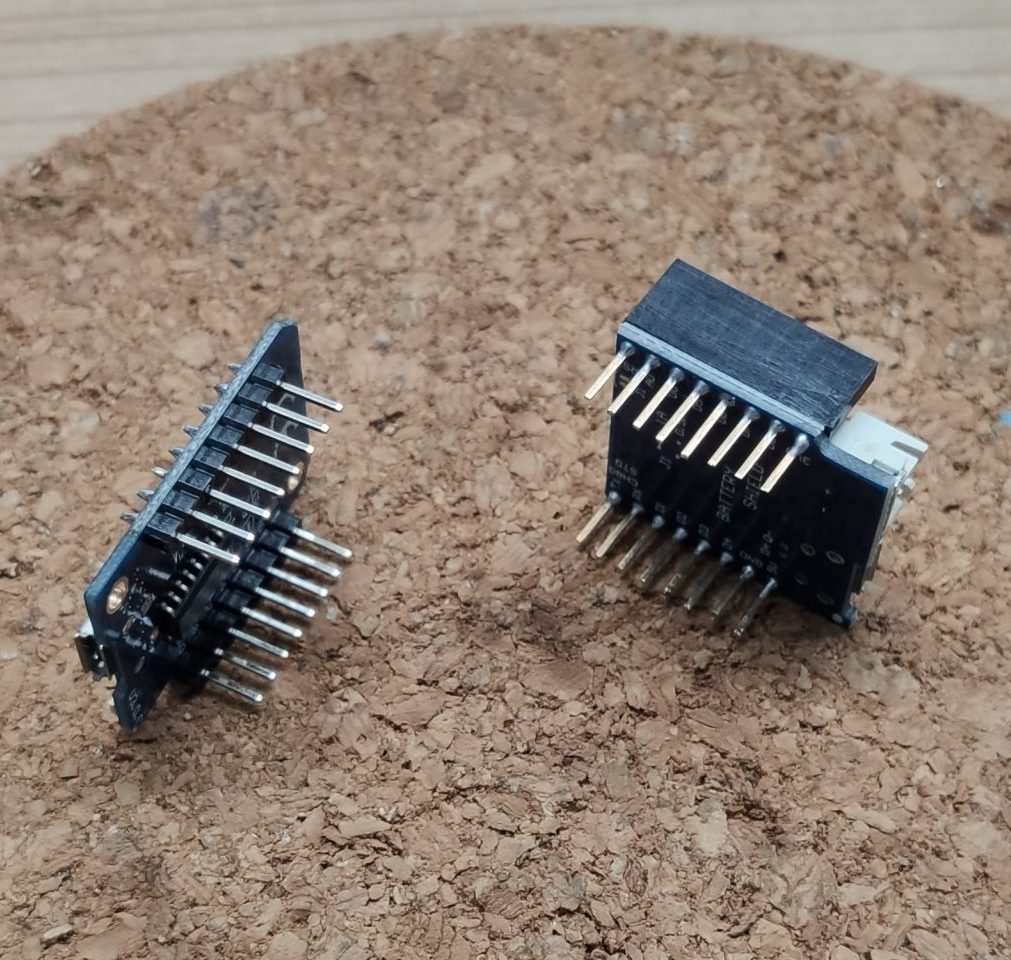
Last not least I soldered the long female pin headers to the D1 Mini battery shield and the male pin headers to the D1 Mini.

Side view of soldered D1 Mini and battery shield
D1 Mini and battery shield soldered

Stack it up!

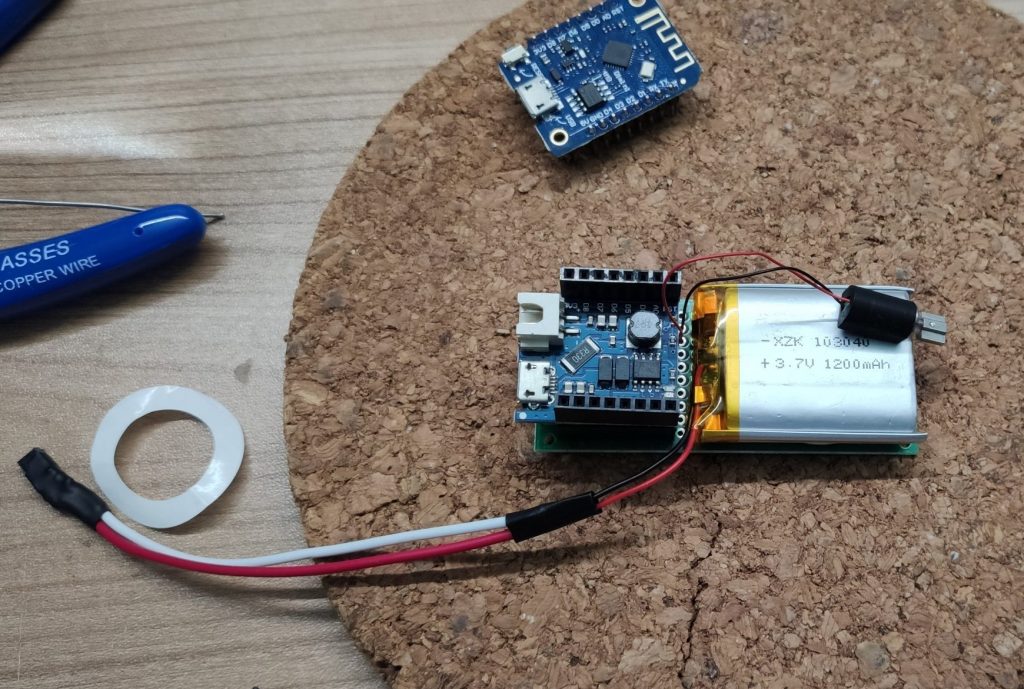
With the complete soldering I was able to stack everything together. I stacked the battery shield on top of the perfboard that the pins were lined up and placed the battery next to it. Then I realized that my battery wires were a bit to short so I had to extend them a few cm’s. The vibration motor went on top of the battery to keep the form factor small.

Top view of the perfboard with the battery shield stacked ontop next to the battery
Battery with extended wires.

To finish the assembly I stacked the D1 Mini on top, connected the battery to the battery shield and secured the vibration motor with some electrical tape.

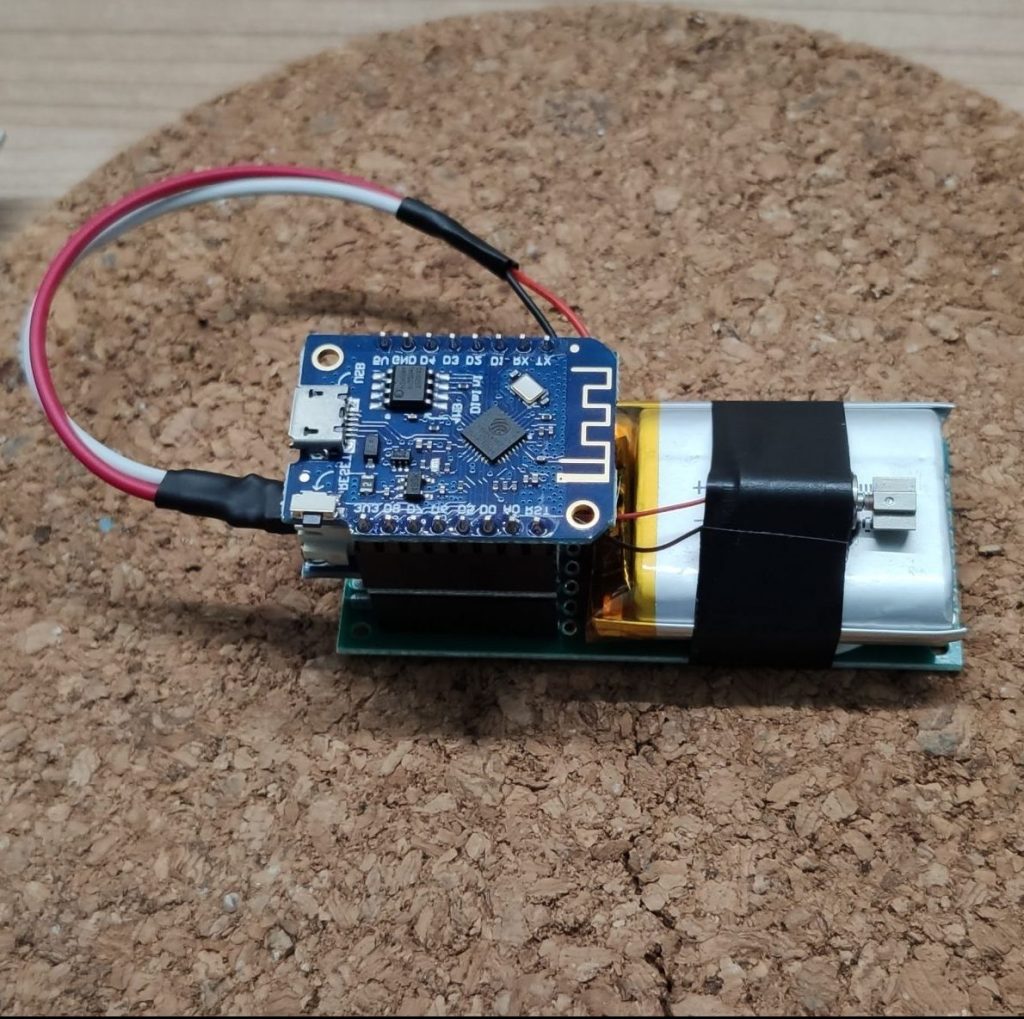
Top front view of the complete functional stack.
The complete stack, ready for the enclosure

The enclosure

As a reaction on my testing tweet I got an DM from Evis Home who asked me If I want to try his tinkercad code block for a project box. This was an awesome coincidence, because I simply had to measure the dimension of the perfboard stack, typed that into his script and within seconds the model was ready. I only had to import the lid into tinkercad to add some holes so that the sound of the buzzer was easier to hear.

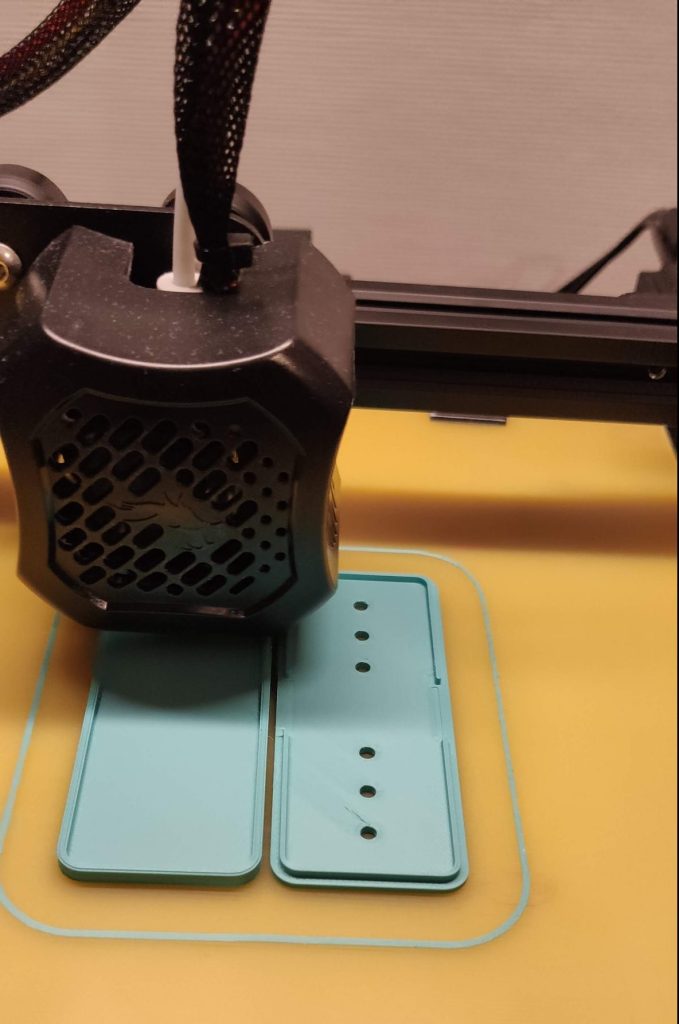
Top view of the enclosure during the print on a 3d printer
The enclosure during the print

The final yard bell project

After the print was finished I put the perfboard stack into it. It fit’s perfect 🤩. That was the time to test everything for the last time.

Video of the final test

Sum up

After some months of project break, this was a really fun and also useful one 🤓. I really like how simple such ideas can be realized with ESPHome and Home Assistant. With only a few components I could built a DIY yard bell which is much more flexible than a off the shelf product. E.g. you could replace the Zigbee button with a motion sensor or activate the yard bell only in the evening. It’s also possible to replace the buzzer with a sound module that plays you favorite song. The possibilities are up to you 😁 .

As always, if you like this project feel free to ping me on twitter and share pictures of your own build.

🔨〽️💦diy filament humidity sensor

If you dive in to the deep ocean of 3D printing, you will face the situation of storeing your filament in a proper way sooner or later. To be more precise, you want to keep your filament as dry as possible because most filaments absorb moisture. If you store your filament in a large box like I do, the humidity value in that box is kinda important. That was exactly the motivation behind this diy project. Of course, that’s not the only case for such a sensor. You can use it in many different scenarios where the humidity and or temperature value becomes important 😉.

Topview of the complete sensor.
The finished sensor ready to use

The Idea

I wanted to create a relatively small sensor, which is battery powered, rechargeable and can be easily integrated into Home Assistant. After some research, I decided to go with the following setup. A simple ESP8266 (D1 Mini) including a battery shield in combination with DHT-11 humidity & temperature sensor. This setup can be easily driven by an ESPHome sketch and seamlessly integrated into Home Assistant. It’s also small enough to fit into a small container which, in my case, was originally made for hair gel.

Parts list

For this project we will use the following components:

*Some links are affiliate links. If you use them to buy the parts for your project you will help me and my next project. These links will cause no extra fee or costs to you

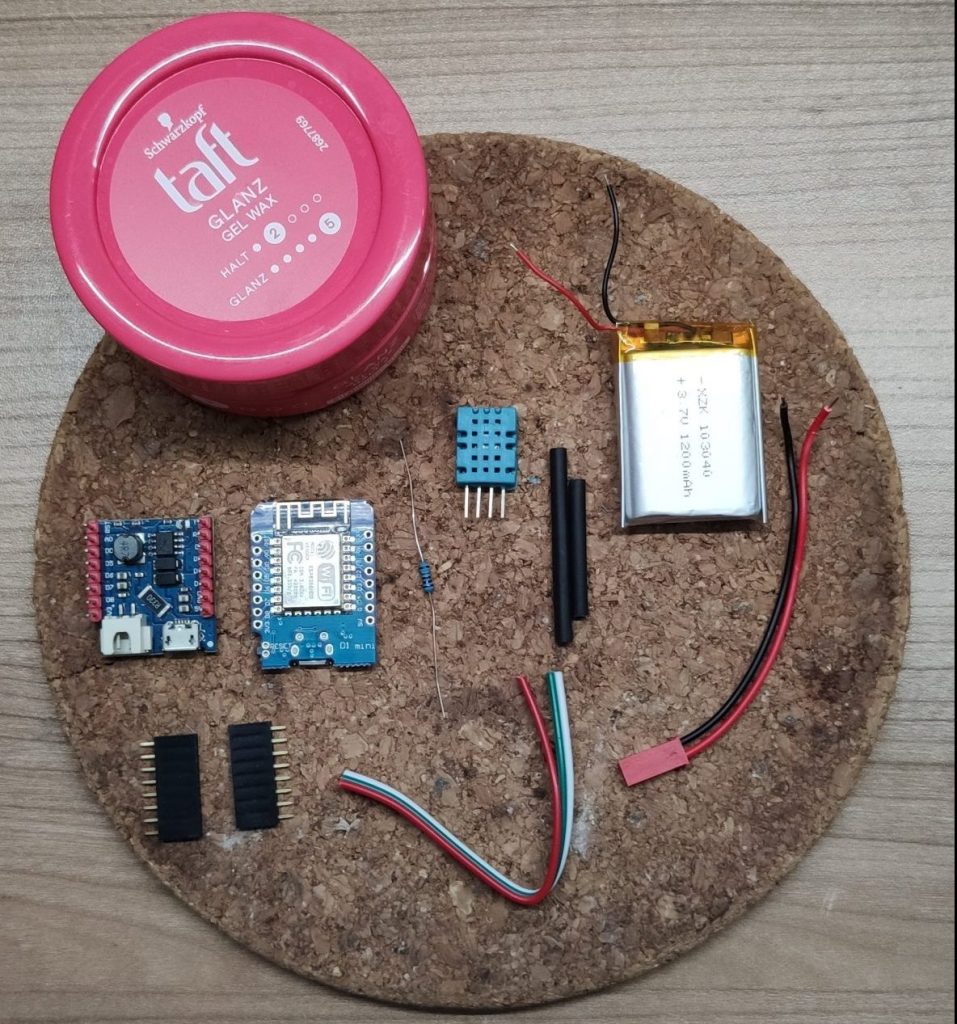
Top view of all components used in this project.
All components

Prepare the D1 Mini

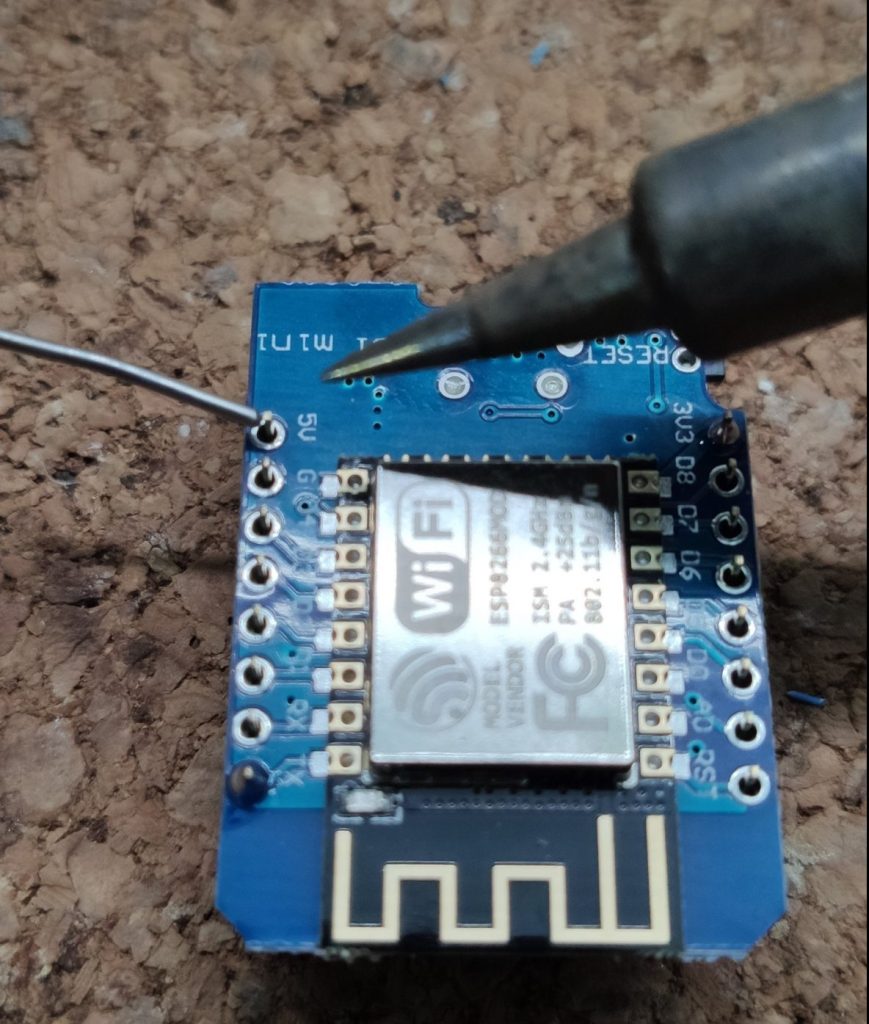
Start with soldering the female pin header to the D1 Mini. Mostly the D1 Mini comes with a variety of pin headers, select the female ones that fits best. Solder the pins to downside of the D1 Mini so that the WIFI antenna isn’t blocked by the battery shield if it’s connected.

Soldering process of the female pin headers
Soldering the pin headers

Prepare the battery shield

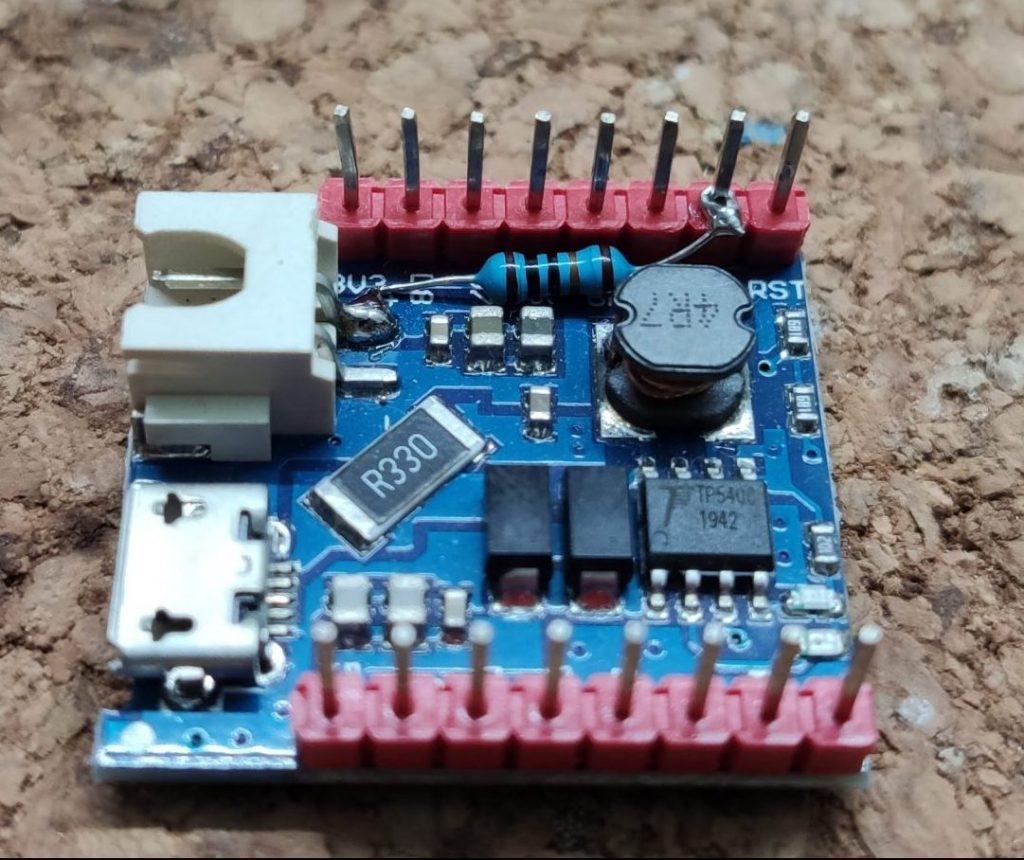
The battery shield will provide the power for the D1 Mini and will also take care of the battery charging process. That’s pretty neat, but with a slight modification, we can make the board even more useful. If you add a 100K Ohm resistor between the plus pole of the battery and the analog A0 pin, you can read the battery operating voltage, which can be used to calculate the capacity of the battery. With that value, you can create an automation in Home Assistant, to inform you if the sensor needs to be recharged.

Closeup of the resistor modification of the battery shield
Modified battery shield

Prepare the DHT-11

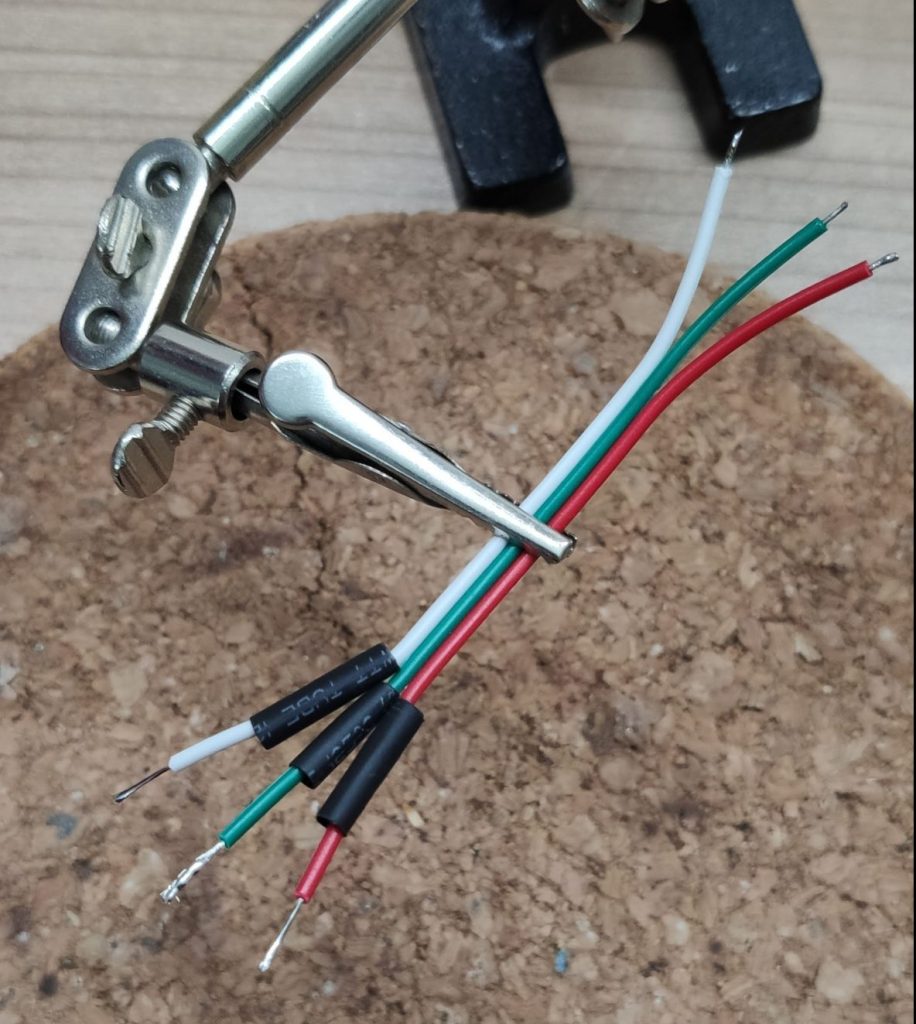
To connect the DHT-11 sensor to the D1 Mini grab some wires and presolder the ends on one side. Next snip of some heat shrinks and slide them over the soldered wires.

Presoldered cables with heat shrinks
Prepared cables

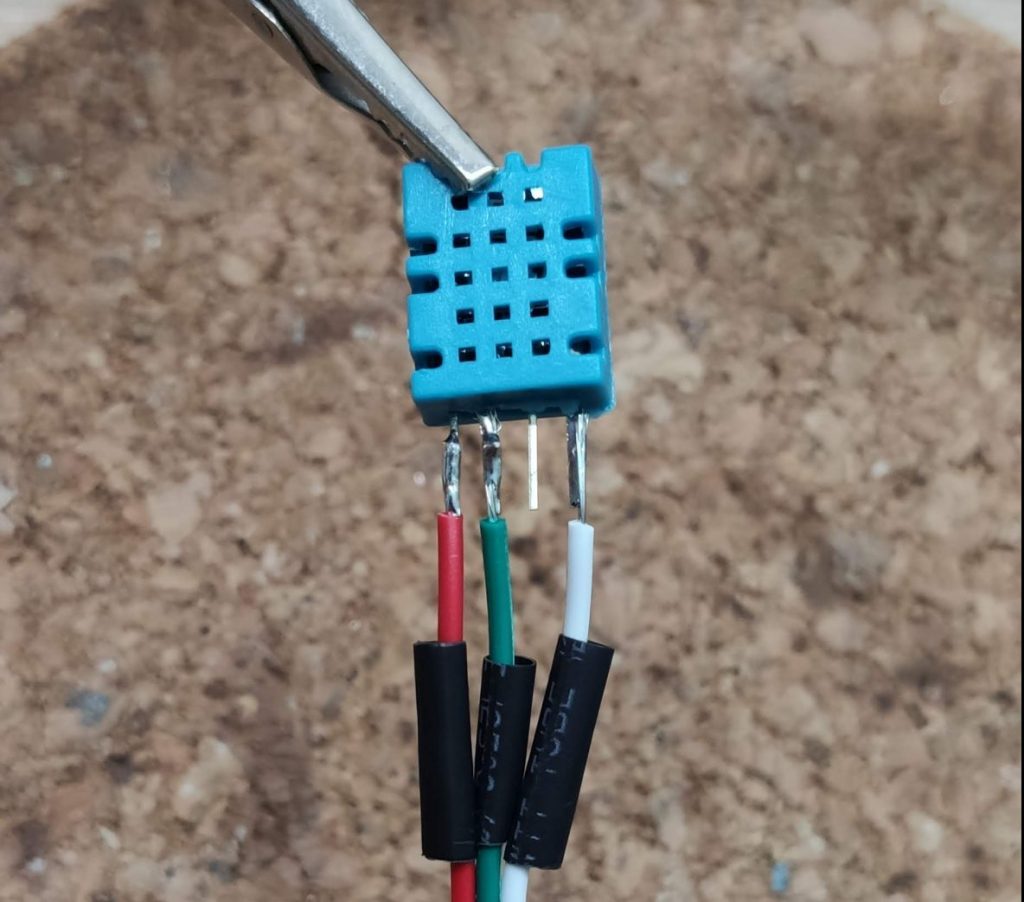
In the next step we will solder the wires to the DHT-11. The DHT-11 has 4 pins in general where the third one f.r.t.l isn’t in use. Solder the wires to DHT-11 as shown on the picture. I used red for positive, white for GND and green as the data wire.

The DHT-11 with soldered wires

Make a Sandwich😉

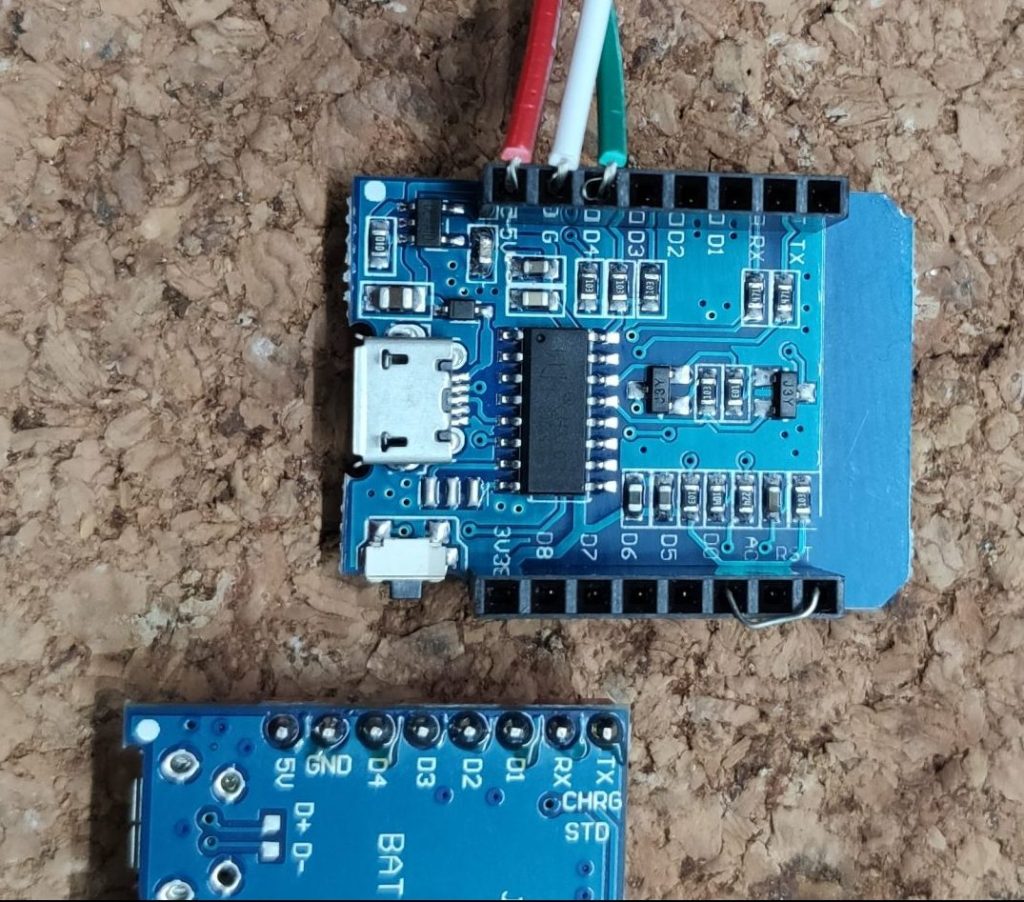
In this step we will connect the sensor to the D1 Mini and the battery shield. So flip the D1 Mini and slide the sensor wires into the females pin header. White goes to the GND pin, red to the 5V pin and green to the D4 pin of the D1 Mini. Further we will connect the RST pin with the D0 pin.

Downside of the D1 Mini with connected sensor and bridged reset pin.
D1 Mini with connected sensor and bridged pins

Connecting RST and D0(GPIO16) is very important, because our sensor will run on battery and not be continuously on. That would consume too much power and the battery would be empty within one or two days. To prevent this, our sensor will use a feature called deep sleep. With this feature enabled, the D1 Mini will only wake up every couple hours, take some measurements, send the data to Home Assistant and fall back into sleep / energy saving mode. This way is super efficient and will max out the battery life up to two weeks instead of two days. To enable deep sleep on an ESP8266 device you have to bridge these two pins, otherwise the D1 Mini will never wake up again.

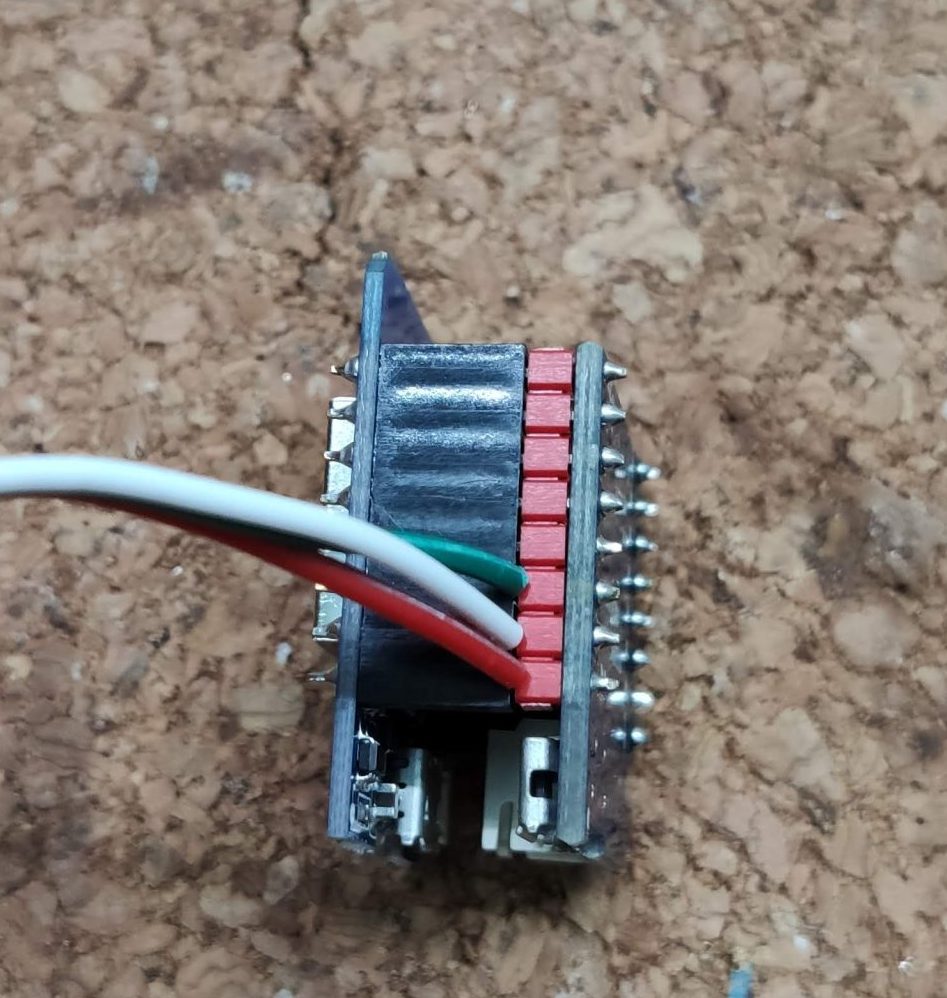
If everything is setup properly, connect the battery shield and the D1 Mini. Keep an eye on the pins, the labels on the battery shield must match with the ones on the D1 Mini.

Close up of the battery shield connected to the D1 Mini
The senors sandwitch

Prepare the battery

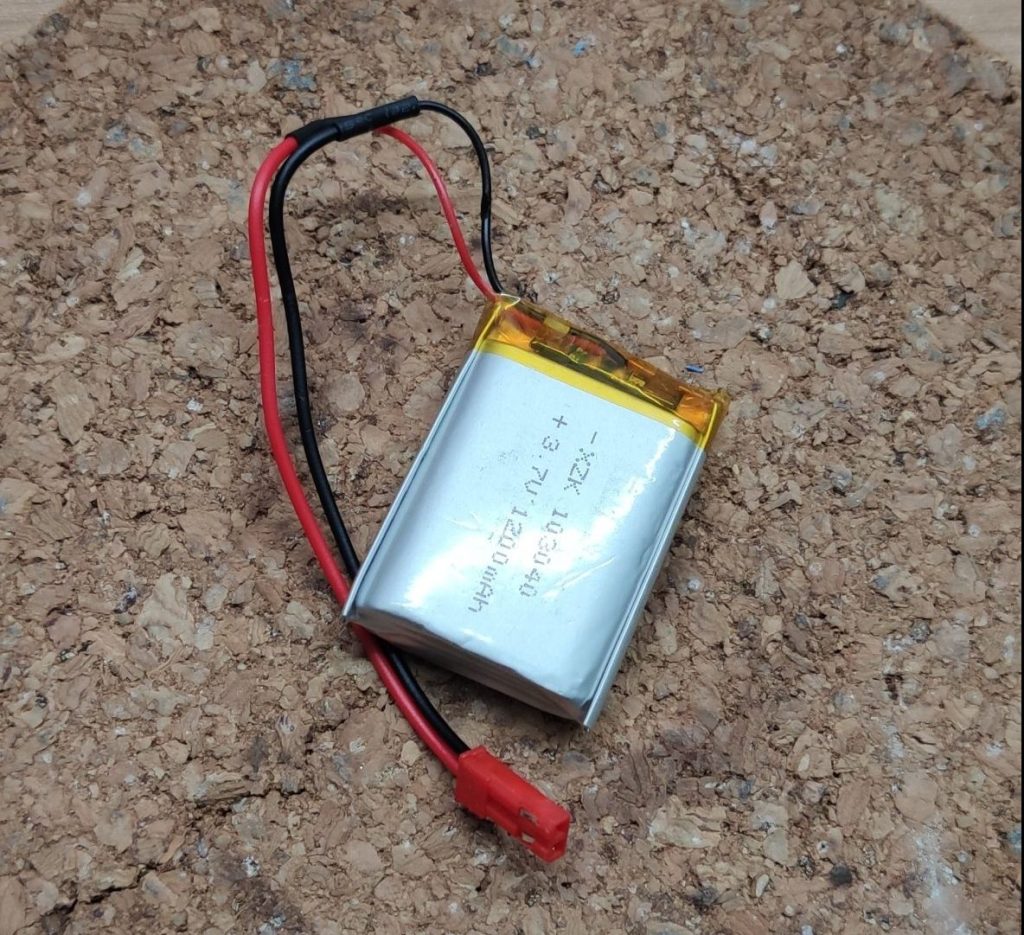
Before we flash the D1 Mini with our sketch, we will prepare the battery to our sensor. If you don’t have a connector, you can simply solder the wires to the battery socket of the D1 Mini battery shield. In my case, I had a spare connector lying around, so I soldered it to the battery to make disconnections simpler. It’s also recommended to disconnect the battery from the D1 Mini while flashing. If you don’t use a connector, you have to disconnect the D1 Mini from the battery shield for the flashing process.

Battery with soldered connector

Flashing the D1 Mini

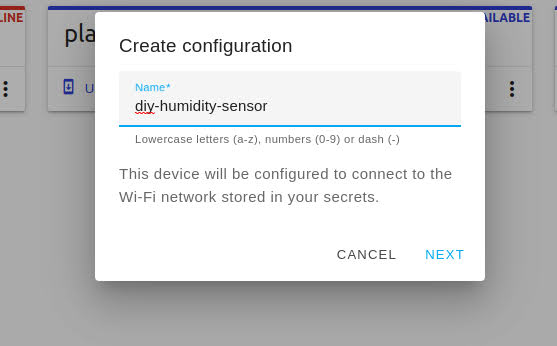
To flash the sketch to your D1 Mini, go to the ESP Home section in your Home Assistant installation and create a new project and start with a project name. I named mine diy-humidity-sensor.

Setup to name your device
Add a useful name

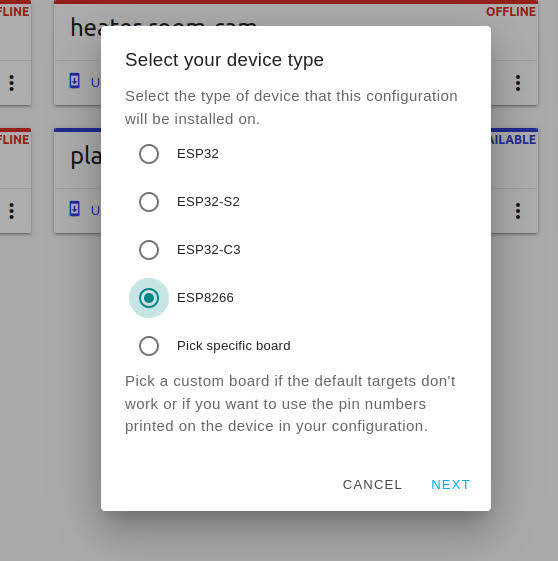
Next choose the board type. Because we are using a D1 Mini click on ESP8266.

Setup an new project in ESP HOME
Select the board

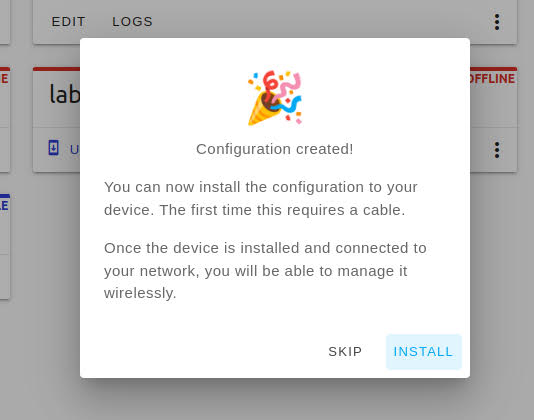
After that click on next and then on install to choose a preferred installation method. I always use the manual download option because I like to flash my ESP’s using ESP Home Flasher.

Finished setup

Install the sketch

To finish the installation, copy the script below to your editor, compile it and flash it to the D1 Mini. If you don’t use secrets, change the WIFI credentials to your needs. This sketch will create several sensors in Home Assistant including the battery percentage one. Further it will use the deep sleep function to operate 1 minute and then goes into sleep for 3 hours.

esphome:
  name: diy-humidity-sensor

esp8266:
  board: d1_mini

# Enable logging
logger:

# Enable Home Assistant API
api:

ota:
  password: "SuperSecr3t"

wifi:
  ssid: !secret wifi_ssid
  password: !secret wifi_password

  # Enable fallback hotspot (captive portal) in case wifi connection fails
  ap:
    ssid: "Diy-Humidity-Sensor"
    password: "SuperSecr3t"

captive_portal:

sensor:
#VCC on batter
  - platform: adc
    pin: A0
    id: "LIFEPO"
    name: "A0 voltage x 3.0"
    update_interval: 18s
    accuracy_decimals: 3
    filters:
      - multiply: 3.0
  - platform: template
    name: "diy-humidity-sensor-battery-voltage"
    unit_of_measurement: 'V'
    update_interval: 18s
    accuracy_decimals: 2
    lambda: |-
      return (id(LIFEPO).state);
  - platform: template
    name: "diy-humidity-sensor-battery-percentage"
    unit_of_measurement: '%'
    update_interval: 18s
    accuracy_decimals: 0
    lambda: |-
      return ((id(LIFEPO).state-2.2) /0.8 * 100.00);

#Temperature and humidity
  - platform: dht
    model: DHT11
    pin: D4
    temperature:
      name: "diy-humidity-sensor-temperature"
    humidity:
      name: "diy-humidity-sensor-humidity"
    update_interval: 18s
    
deep_sleep:
  id: deep_sleep_1
  run_duration: 60s
  sleep_duration: 180min

Finish the installation

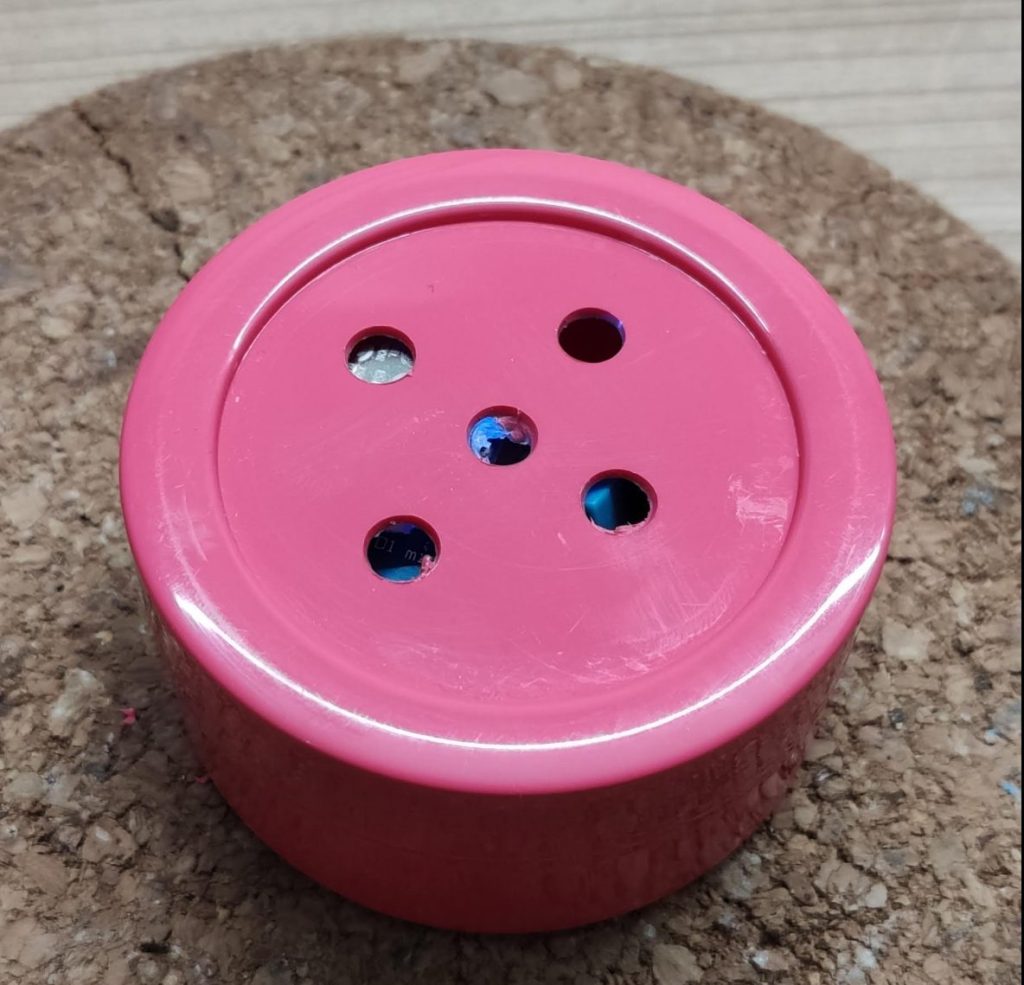
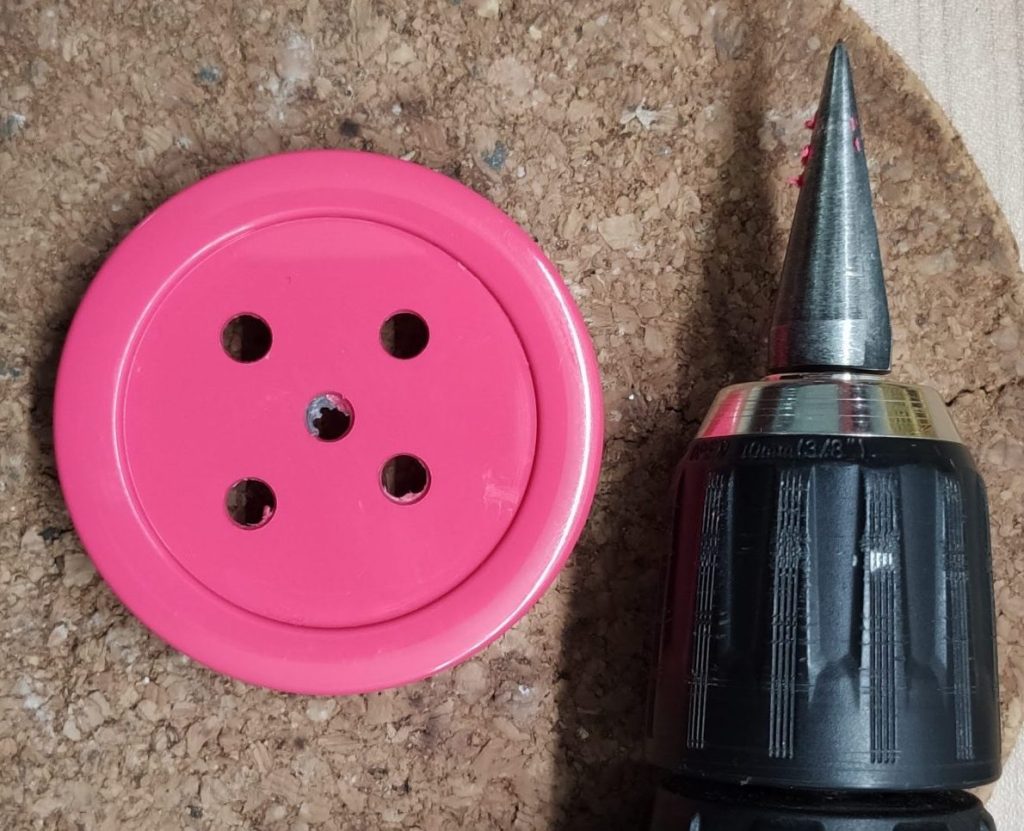
After flashing the D1 Mini, grab your enclosure and ensure that the DTH-11 will be exposed to the air. I drilled some holes into the lid of my container to ensure that.

Topview of container lid with holes
Lid with holes

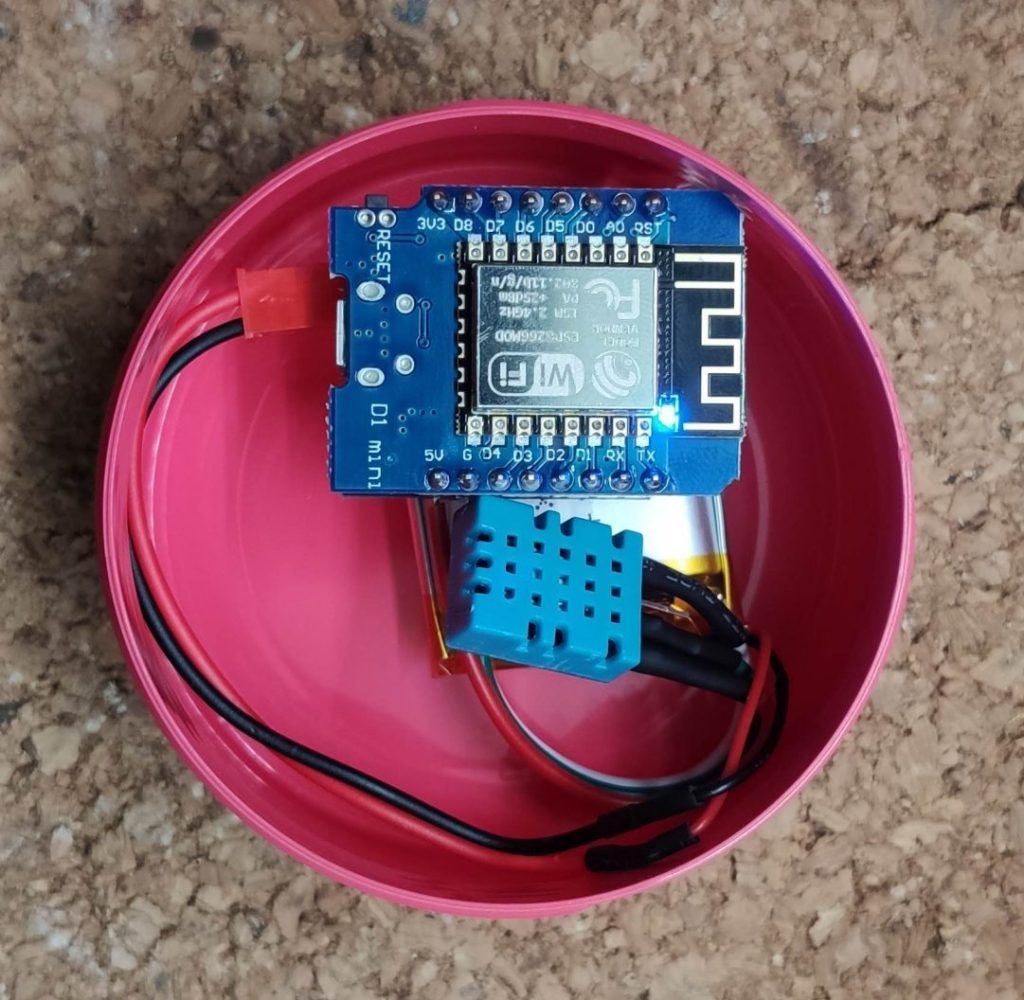
Last not least connect the battery to the battery shield and place everything inside the container.

Sensor in the container

UPDATE: During my tests, I found out that the LED on the D1 Mini uses a quite large amount of power. This will decrease the run time of the sensor, so I desoldered the LED from the D1 Mini 😬.

Check Home Assistant

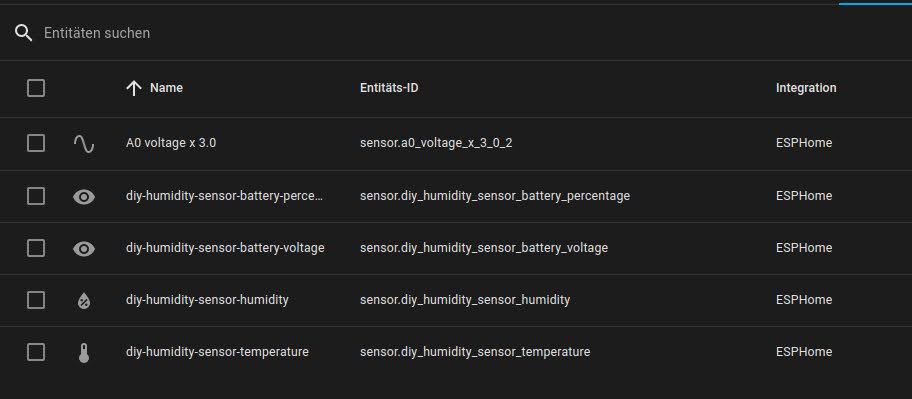
After connecting the battery to the sensor, you will find a new ESPHome device in Home Assistant which provides the sensors, which were defined in the sketch.

Home Assistant entity list
Entity list

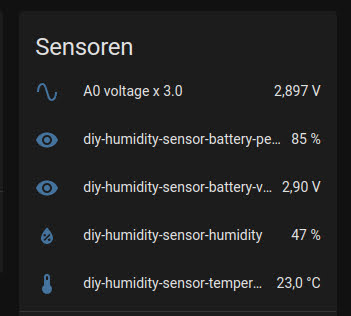
These entities can simply added to a dashboard or used in an automation.

Dashboard card
Values in the dashboard

Sum up

And that’s it. Your diy filament humidity sensor is ready to go 😁 You can now measure the current humidity and temperatue inside you filament storage. You can also use the sensor data in an automation which informs you if the humidity in your filament storage increases or exceeds a certain level. Or you can display the information on a dashboard like I did.

I hope you like this project and I’m looking forward to your comments and shares.